Selenium WebDriver is the cornerstone in the world of web app testing. It allows QA Engineers to communicate with web apps in the similar way a real-world user would, which includes entering text, clicking buttons, and navigating through pages. This article will give a detailed introduction to Selenium WebDriver, covering its explanation, key traits, architecture, and a step-by-step guide to getting started. Besides, it will also give insight into best practices to make certain your automation testing is scalable and efficient.
What is Selenium?
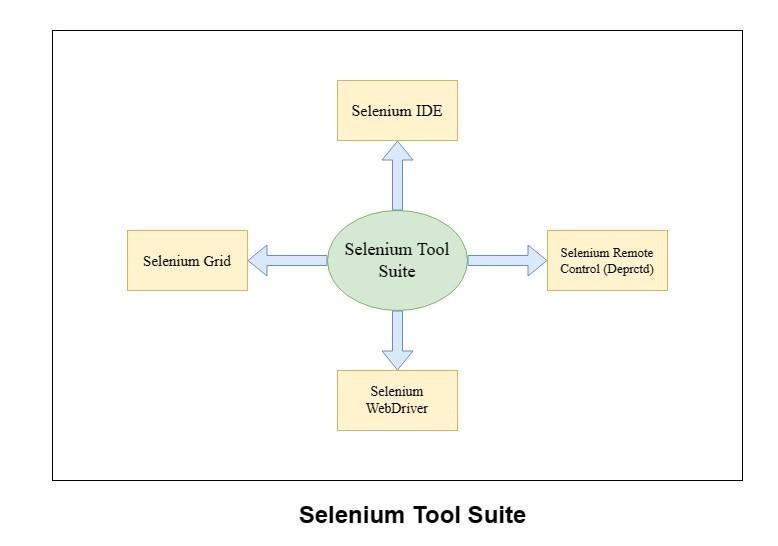
Selenium is an extensively used open-source framework with a suite of automated tools for testing web apps. It has a series of libraries and tools that allow QA Engineers and software developers to automate tests across multiple platforms and browsers. The framework is versatile and can function with several programming languages such as Python, Java, and C#, making it adaptable to diverse test environments.
- Selenium IDE: It is the effectual tool in the Selenium suite. As a Mozilla Firefox add-on, it rapidly creates testing using its record-and-playback trait. Its installation is stress-free, and learning is simple and straightforward. While programming understanding isn’t a prerequisite for using Selenium IDE, familiarity with JavaScript, HTML, and the DOM (Document Object Model) improves the capacity to harness the tool’s full potential.
- Selenium Grid: Acts as a server, allowing testing to execute simultaneously on several machines. It enables QA Engineers to distribute test implementation across varied platforms and browsers. It eases large-scale testing and provides centralized control over the implementation of tests.
- Selenium RC (Remote Control): Selenium RC was a previous version of Selenium that simplified automated tests of web apps using programming languages such as Python, Java, etc. It interacted with browsers through JavaScript-based Selenium Core and offered a client-server architecture for implementing test scripts.
- Selenium WebDriver: Selenium WebDriver is designed for more flexible and sophisticated testing requirements. WebDriver, when combined with Selenium Grid and Selenium IDE, makes testing run reliably and rapidly on a big scale. WebDriver performs deeds on web components and is compatible with various programming languages such as C#, Java, Python, PHP, and more. Besides, it smoothly incorporates frameworks like JUnit and TestNG to facilitate effectual test management.
What is Selenium WebDriver?
Selenium Web Driver is an improved version of Selenium RC that fixes its drawbacks. It talks straight to web browsers using exceptional techniques, avoiding the requirement for Selenium RC. WebDriver includes a built-in Mozilla Firefox driver (Gecko Driver). You have to include their particular drivers to perform testing on other browsers. TheMOST commonly used WebDriver versions include Opera Driver, Google Chrome Driver, Internet Explorer Driver, Safari Driver, and HTML Unit Driver (a specific headless driver).
Architecture of Selenium WebDriver
The architecture of Selenium WebDriver comprises four essential elements:
- JSON Wire Protocol: This protocol is utilized to transfer data between the customer libraries & the web browser. It directs commands in JSON format from the libraries (client libraries) to the web browser.
- Selenium Client Libraries: The Selenium libraries are accessible in numerous programming languages such as JavaScript, Java, Python, C#, and Ruby. They let you write test scripts in your preferred language.
- Browser Drivers: Every single browser (Firefox, Chrome, Edge, Safari, etc.) has its own driver, which acts as a bridge between the web browser and Selenium commands. The driver interacts with the browser via the browser’s native assistance for automation.
- Browsers: The real web browsers where the test is performed. WebDriver supports every single major browser.
Key Traits of Selenium WebDriver
Selenium is an extensively used open-source testing framework that comes with loads of features, some of which are mentioned below:
- Browser Control with WebDriver API: It allows controlling web browsers programmatically for tasks like form filling and link clicking, enabling easy script creation and integration with other tools.
- Language Support: Selenium WebDriver supports multiple languages such as JavaScript, Java, Python, C#, and Ruby, providing flexibility for automation testers to use their preferred language.
- Cross-Browser Testing: Selenium WebDriver facilitates testing on various browsers like Chrome, Firefox, and Internet Explorer, ensuring compatibility across different browsers and devices.
- Robust Automated Testing: Testers can create automated, robust tests using Selenium APIs in different languages, along with cross-browser support, integration capabilities, and customization options. This saves time with parallel testing via Grid Distribution across multiple machines.
- Efficient Parallel Testing and Grid Distribution: Parallel testing allows running multiple tests simultaneously on different machines, while Grid Distribution distributes tests across various devices, speeding up test execution, especially with a large number of tests.
- Customization with Extensions and Plugins: Users can enhance Selenium WebDriver’s capabilities by installing plugins or user extensions, adding new features, or customizing existing ones to meet specific project requirements.
- Integration with Testing Frameworks: Selenium WebDriver seamlessly integrates with other testing frameworks like JUnit or TestNG, enabling the creation of automated tests for web applications.
- Test Reporting and Dashboards: Selenium generates detailed test reports and real-time dashboards, aiding testers in monitoring progress and quickly identifying issues in automated tests.
Getting Started with Selenium WebDriver
To begin using Selenium WebDriver, follow these effective steps:
Step 1: Setup/ build the Environment
- Java Installation: Selenium WebDriver needs Java to be installed on your PC. Download and install the most recent JDK from Oracle’s authorized site.
- Set up Your IDE (Integrated Development Environment): Download & install an IDE such as Eclipse or IntelliJ IDEA. These tools will assess how to write and handle your Selenium scripts.
- Download Selenium WebDriver: Browse the authorized Selenium site * download the Selenium WebDriver Java client library.
- Add WebDriver to Your Project: In your Integrated Development Environment, generate a new Java project & add the Selenium WebDriver JAR files downloaded version to your project’s build path.
- Download Browser Drivers: Depending on your chosen browser for testing, ensure to download the corresponding driver. For instance, if you’re using Chrome, acquire the ChromeDriver from this location.
Step 2: Writing Your First Test Script
Less see example of a Selenium WebDriver test script in Java:
import org.openqa.selenium.WebDriver;
import org.openqa.selenium.chrome.ChromeDriver;
public class SeleniumTest {
public static void main(String[] args) {
// Set the path to the ChromeDriver executable
System.setProperty(“webdriver.chrome.driver”, “path/to/chromedriver”);
// Initialize a new WebDriver instance
WebDriver driver = new ChromeDriver();
// Navigate to a web page
driver.get(“https://www.example.com”);
// Perform some actions (like interacting with web elements)
// For instance, print the title of the page
System.out.println(“Page title is: ” + driver.getTitle());
// Close the browser
driver.quit();
}
}
In this script:
- WebDriver driver = new ChromeDriver(); sets an instance of the Chrome browser.
- The System.setProperty technique initiatives the path to the ChromeDriver executable.
- System.out.println(driver.getTitle()); prints the title of the page to the console.
- driver.get(“https://www.example.com”); opens the definite URL in the browser.
- driver.quit(); closes the web browser.
Step 3: Running the Test Script
For implementing the test script, simply compile and implement it from your IDE. Make sure that the path to the ChromeDriver is properly set, and that the ChromeDriver executable has the essential permissions to run on your OS.
Advanced/ Sophisticated Features
- Locating Elements: Utilize various strategies to find elements on a webpage, including name, id, tagName, partialLinkText, className, linkText, xpath, and cssSelector.
- Managing Windows & Frames: Switch between varied frames and windows by making use of methods like driver.switchTo().window() & driver.switchTo().frame().
- Synchronization Techniques: Employ implicit and explicit waits with WebDriverWait and ExpectedConditions to manage synchronization issues effectively.
- Data-Driven Testing: Incorporate WebDriver with CSV or Excel files to seamlessly conduct data-driven testing.
- Browser Configuration and Capabilities: Customize browser capabilities and settings using classes such as FirefoxOptions, ChromeOptions, etc.
- Capturing Screenshots: Take screenshots of web pages to aid in debugging and reporting work through the TakesScreenshot interface.
Selenium WebDriver Limitations
Despite its utility, Selenium WebDriver does have notable drawbacks that QA Experts should be aware of for effective testing:
- Limited Desktop Application Support: WebDriver focuses on web applications and may struggle with desktop apps. For instance, handling pop-up windows from desktop apps might require supplementary tools like AutoIt.
- Challenges with Dynamic Elements: WebDriver can encounter issues with dynamic content such as AJAX or JQuery-based apps. For example, it might attempt interaction with elements before or after they load dynamically.
- Difficulty with CAPTCHA: Automation of CAPTCHA and reCAPTCHA, designed to thwart automation, is beyond WebDriver’s capabilities. Manually intervening for CAPTCHA verification is necessary.
- Lack of Built-in Reporting: WebDriver lacks native logging or report generation, necessitating external tools like TestNG for reporting test results automatically.
- Mobile and Multi-touch Limitations: Selenium isn’t optimized for mobile app testing and has limited support for multi-touch actions. For instance, automating touch gestures like pinching or swiping may be challenging, prompting the use of tools like Appium.
- High Technical Skill Requirement: Proficiency in a programming language (e.g., Java, C#, Python) and a deep understanding of DOM and web technologies are crucial for scripting in WebDriver. This means testers without robust programming skills or knowledge of HTML and CSS may face difficulties.
Using Selenium WebDriver on Cloud
While Selenium WebDriver is incredibly useful for automating browser interactions and conducting thorough testing of web applications, handling various browsers, versions, and operating systems locally can be quite a task. This is where cloud-based testing platforms like LambdaTest prove invaluable. LambdaTest stands out as a top-tier cloud-based cross-browser testing platform, enabling you to execute Selenium scripts on a scalable and dependable cloud infrastructure.
How to set up LambdaTest
To start testing on LambdaTest, the initial step involves setting up an account on the platform and setting up some configurations to help perform the test on LambdaTest.
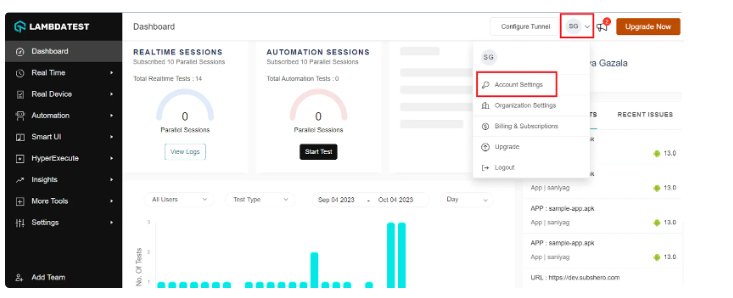
Step 1: Generate an account on the LambdaTest Platform.
Step 2: Obtain your Access Key and Username by going to your Profile section from the LambdaTest dashboard and choosing Account Settings from the list of preferences.
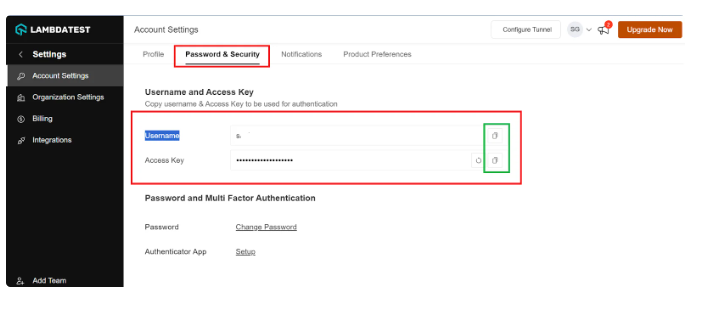
Step 3: Copy your Access Key and Username from the tab called Password & Security
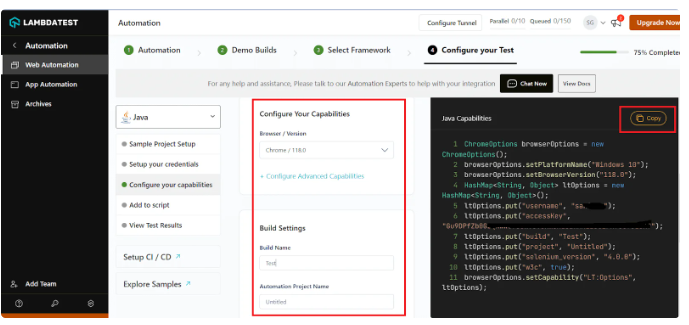
Step 4: Create competencies containing information such as your desired browser and its multiple OSs and obtain your configuration specifics on LambdaTest Capabilities Generator.
Step 5: As you finally have both the Access key, Username, and capabilities copied, all you have to do is paste it into your testing script.
Selenium WebDriver Best Practices
Here’s a comprehensive guide to using Selenium WebDriver effectively:
- Use the Page Object Model (POM): Organize code using the Page Object Modelto encapsulate web actions and elements, perfecting maintainability and readability.
- Opt for Explicit Waits over Implicit Waits: Explicit waits deliver better control by waiting for precise situations before proceeding.
- Implement Test Assertions Effectively: Assertions validate expected test behavior.
- Ignore Hard-Coding Values: These values reduce flexibility and delay test maintenance.
- Follow Descriptive and Consistent Naming Conventions: Clear and consistent naming enhances code readability and comprehension.
- Handle Exceptions Gracefully: Proper exception handling prevents unexpected test failures and provides informative error messages.
- Leverage Browser-Specific Options and Capabilities: Customize browser settings to optimize performance and stability.
- Optimize Test Execution Time: Faster tests provide quicker feedback and improve development efficiency.
- Maintain a Clean Test Environment: Ensure tests aren’t influenced by residual data from prior test runs.
- Adopt Data-Driven Testing: Test various scenarios with different data sets without code duplication.
- Keep Testing Isolated and Independent: Such forms of tests prevent one test’s failure from impacting others.
- Frequently Update and Manage Test Scripts: Keep test scripts up to date to guarantee effectiveness and relevance.
Conclusion
Incorporating LambdaTest with Selenium WebDriver enhances your overall test capabilities, providing the flexibility of Selenium and the convenience of a cloud-powered testing platform. This powerful combination helps ensure your web applications are thoroughly tested across different environments, leading to higher-quality releases and improved user satisfaction.
Frequently asked questions
- Is it possible to use Selenium WebDriver for mobile app testing?
Selenium WebDriver is primarily designed for web application testing, but Appium is a popular choice for mobile app testing. The test automation tool like Appium extends the WebDriver protocol to function with mobile devices, allowing testers to use WebDriver commands to automate interactions with apps.